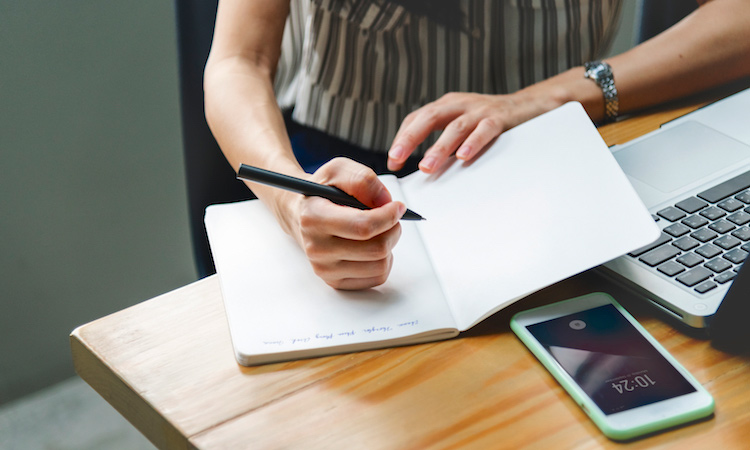
Facebook Live video is currently favoured by the Facebook algorithm, over an above any other form of content in the newsfeed. So, from a social media and real estate marketing standpoint it’s the perfect medium for promoting yourself.
In fact, if you’re looking for the most straightforward and quickest way to create video content, then you can’t go past Facebook Live. There are no expensive production costs and no need for a videographer. Your video is recordable from your computer desktop or smartphone, and the best part is there’s no post-production.
Overall, regularly posting videos on social media sites gives people a chance to get to know a bit about you and showcase your real estate expertise (before they’ve even met you in person).
“Facebook Live video helps you build that all-important know, like and trust factor.”
Take the plunge with Facebook Live video and you’ll most certainly increase your exposure to local homeowners. You may even become the most high-profile real estate agent in your postcode. It’s far more effective than the old DL postcard. Plus it’s cheaper and has lead generation value, too.
But doing anything new can be daunting. Remember though that it can also be fun; it just comes down to practice! So, be courageous, quit putting-off “putting yourself on-the-line” or on-camera so to speak, and go for it!
To help, I’ve put together this step-by-step guide to preparing your Facebook Live video shoot (compiled with the help of our resident video coach, Sue Moses).
Before you launch your Facebook Live video
In the words of the military;
“Proper planning and preparation prevent piss poor performance!”
No doubt you want to do a great job and ensure your social video communicates well and gains cut-through. Well, you may not realise but most of the effort goes into the pre-planning and your pre-production setup.
In fact, you can spend anywhere from 30 minutes to 1 hour to get yourself ready to Go Live, so keep that in mind when you set aside time in your busy schedule.
Planning your Facebook Live video message
If you only take one thing away from today’s article it’s this;
“Be absolutely clear on your message and know who your ideal audience is.”
Firstly, consider who you’ll be speaking to. Is it home buyers? Sellers? Or the community as a whole?
Tip: Don’t use the same jargon you would in your weekly sale’s meeting. Don’t refer to properties as ‘listings’ and homeowners as ‘vendors’, as this is industry speak.
And avoid acronyms such as VPA (vendor paid advertising), OFI (open for inspection), EOI (expression of interest) and so forth, as much as possible.
Remember most people that buy or sell property do this on average once every seven years. So your everyday real estate lingo will be unfamiliar to them. Explain everything in layman’s language as much as possible.
When you can, say the point of your message in one sentence. Imagine telling your Barista – if they’d understand, you’re ready to start!
It’s okay to talk, talk, talk but ideally you want to get your point across in as concise a fashion as possible. The first ten seconds are the most important too. Most viewers will stop watching after 6 or so sections, so peak their interest, and don’t waste words at the start.
There’s no point stating who you are or what you do – that will be evident from your social media profile, and if they’re interested in what you have to say you can wrap up with that information at the end.
Light, light, let there be [natural] light
If you want to look good (and who doesn’t) you need to review the light you are filming in carefully.
Natural light is very flattering to work with indoors, but can be quite harsh outside, especially in the middle of the day when it can cause heavy shadows.
Tip: Open the inbuilt camera app on your smartphone and walk around looking at the screen until your face is lit well, with no shadows.
Once you’ve found a spot where the light is ideal, check your background. Apart from yourself, what else will your audience see?
Is the background visually appealing? Does it contrast well with the colour of your outfit – remember, you need to stand out not blend in.
Will people be moving through the frame behind you? Ideally, you won’t want anyone to walk through your shot, as that will be distracting to the viewer.
If you’re recording indoors, try and find natural light coming in from a window. I recommend facing the window and creating a lovely backdrop behind you. Based on the fact that you’re a real estate agent, a couch or dining room can be a great location. Shuffle the lounge or table around to make the most of the light.
If you’re recording indoors, then you might also wish to invest in some professional lighting. A dimmable diva ring light, on a tripod stand, is worth considering as part of your video marketing kit. Presently, you can purchase a high-quality diva ring light for between $80 to $150.
Sound check, 1, 2, 3, 4
Unless you have professional sound recording equipment, your phone or computer should be no more than arm’s length away when you record.
It’s a good idea to purchase a lapel mic to help ensure your voice is crystal clear and any background noise is reduced as much as possible.
Find a location that is quiet and unlikely to have noise interruptions. Avoid high streets (mainly because of the road traffic), office fans or aircon units indoors can be problematic too. Outdoor locations need to be sheltered out of the wind and be aware that meeting rooms can have an echo, as can rooms with concrete or tiled floors.
Tip: Conduct a sound check by recording a practice video that’s not Live. Play it back to check the surrounding sound, as well as how clear your voice sounds.
Consider purchasing some sound equipment. You can purchase a high-quality lapel mic for an iPhone for around $50. Do some online research.
Here are some fun video outtakes from “Selling In Heels” agent, Katherine Kavadis:
Love a busy open for inspection!
Posted by Katherine Kavadis on Thursday, 31 May 2018
Camera stabilisation – reduce the wobble
Most smartphones today have inbuilt stabilisation for video recording. It is vital, however, to ensure that you don’t move your camera around too much if you want to achieve a professional video look and feel.
Even if you’re walking around during the Facebook Live stream, try your best to keep your camera as controlled as possible.
Invest in a tripod or a gimbal.
You can purchase a tripod with a mobile mount for as little as $20. My advice, however, is to buy one that allows you to position your phone to record in portrait mode, not just landscape, too. Several tripod mounts that allow this.
If you want to push the boat out – and are skilled enough to walk and talk at the same time – consider the virtues of a handheld gimbal for your smartphone. These start at around $150.
Framing your Facebook Live video
Tip: Live stream with the camera in portrait, not landscape as most people will watch you on their mobiles.
It’s highly likely that your audience will watch your social media video from their mobile device. And you can, in fact, check which device or screen size the majority of your viewers are watching via (after your video recording is complete).
Tip: I recommend checking your video statistics around seven days after your social video was posted. You’ll see the most comprehensive insights that way because you’ve allowed time for the video to be seen in the feed.
Remember too that people in videos on mobile screens are small. So, when framing up your video, aim for your chest up. Keep a little space around your head and to the sides of your body, especially if you tend to be expressive and move your arms around a lot.
Sitting down helps you to stay still and stay within your frame throughout the recording. It also helps you to stay mentally focused and on topic too!
Tip: To really connect with your audience, person to person, look into your camera lens, that way people watching will focus in on your eyes and feel like you are talking directly to them!
Once you are happy with your entire set-up, do a final test recording but this time use Facebook Live. This can be done by selecting the ‘me only’ audience from the Live Video option on your personal Facebook profile (note, it’s not available from your page).
Review your video, and make final minor adjustments to your set-up – now you’re ready to Go Live.
Tip: If you are new to self-recorded videos you might consider starting with a few pre-recorded ones first.
Pre-recorded videos allow you to learn to talk to the camera, in a more natural manner, without the pressure of going Live.
I recommend keeping your video between one and three minutes in length to start. If you stuff up or stall, you can easily start over.
Try to take as few retakes as possible too, because your energy levels tend to dwindle over time and your video won’t be as compelling or engaging.
It’s time to Go Facebook Live
OK, great, you’re finally ready. We’ve done the lights, the camera, so now its ACTION!
Here is the final instruction on how to find Facebook Live on a desktop screen and within the mobile app;
1. Open Facebook and navigate to your page or profile.
Note: if you’ve signed up to Facebook Business Manager you’ll need to switch to that “grey world” to Go Live from your Facebook page.
2. Select the Live Video option, located at the top of your Facebook profile or page.
3. If you’re on your profile you can select your audience from the drop-down options; these include Public, Friends, Only me, etc.
4. Most important – check that your video will go out as a post, not a story, otherwise it will disappear after one day.
5. Write a compelling intro to appear in the post text (one sentence about who your video is for and what they will learn is fine, you can add more details after the live event is complete as well.
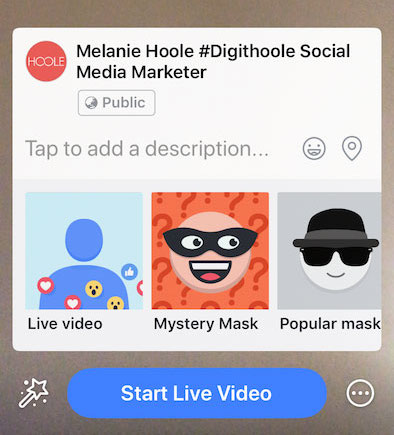
5. Tap the magic wand at the bottom of the screen to select a branded frame (if you have one).
6. Then when you are ready, and sitting comfortably, hit the ‘Start Live Video’ button.
7. Watch the countdown – you have three seconds until your video starts.
8. Start talking!
Finally, you’re LIVE!
And if you want some handholding to help get you up and running with Facebook Live, don’t forget about our resident Video Coach, Sue Moses, whose available on an hourly basis to come and give you more expert tips all the support and confidence you need.
Even better, we’re running a training event on the 22nd of June and part of that training is Facebook Live! Click the banner below to find out more…
Written by Melanie Hoole
My team and I specialise in helping real estate and property professionals perfect their personal brand, build a first-class digital profile and implement inbound marketing activities to attract leads. If you are unsure which direction to take with your digital marketing contact me for help.
Join the Conversation - add your thoughts